Two-Colour Cast On

I used this Two-Colour Cast On to start my Lambton Panes shawl. I chose this cast on to mimic the slipped-stitch garter stripe edging that runs along the top edge of the shawl. After the first two stitches, it is simply a cable cast on, alternating colours. It’s a pretty simple cast on to perform, with pretty results.

What you’ll need: Needles required for the pattern, two colours of yarn.

Instructions:
First, with CC, make a slip knot and place it on the left needle tip.

step-1-slip-knot

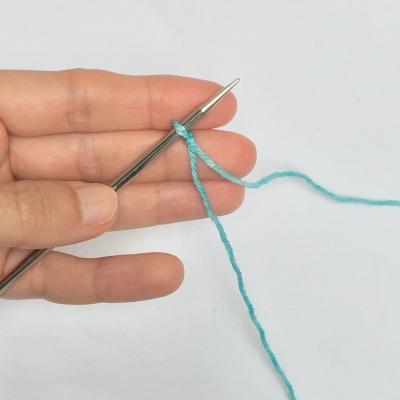
Now insert the right needle tip into the slip knot knitwise, wrap with MC (leaving an end to weave in later), pull through and place on the left needle tip.

step-2-second-st
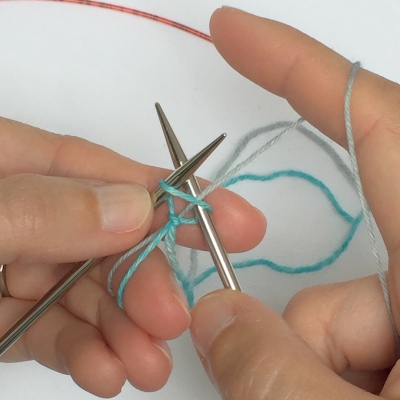
To make the third stitch, insert the right needle tip between the first and second stitches, wrap with CC, pull through and place on the left needle tip. Note: Always grab the next strand from behind the previous strand.

step-3-third-st

Make the subsequent stitches in this manner, inserting the needle between the first two stitches on the left needle tip, wrapping with alternating strands, and placing on the left needle tip. Do this until the required number of stitches have been cast on.

done-all-sts

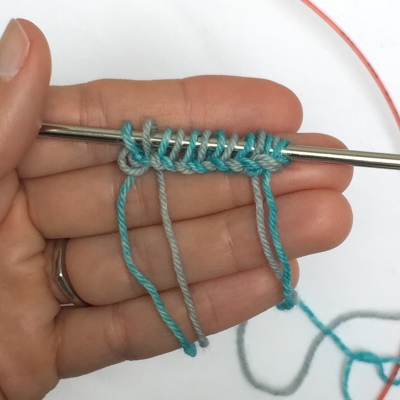
And that’s all there is to it! You can use this to cast on as many as you need. It’s also a great one to use for the beginning of a two-colour brioche project, or perhaps some corrugated ribbing.

It’s a 2-Pattern Kinda’ Day

This is a big day Chez Cowtown Knits. I’ve been working on two collaborations with Third Vault Yarns, and both have just been published. Lola and I chatted about working together on some kits while sitting at Knit Night a couple of months ago. She has dyed up some gorgeous yarn and I designed a couple of patterns that I hope do the yarn justice.

The first pattern is Lambton Panes. This is a top-down shawl featuring garter stitch stripes in a gradient (Cowtown colourway!!!) and a semi-solid, with slipped stitches travelling down to make a lattice pattern. The way the gradient changes through the background makes my heart sing!

Spread out

The pattern has both charted and written instructions, and a photo tutorial for the two-colour Cast On. And because I have a technical-editor-extraordinaire (aka Eleanor Dixon), the pattern is easy to follow. All of this is to say that there’s no need to be intimidated.

front cover

The other new pattern is for the Chainlink Mitts. These are a simple, fun little fingerless mitts with a touch of stranded colourwork. These were designed to highlight Third Vault’s Gytha Worsted yarn and look great with the variegated (Drink Me) colourway as the MC or the CC. If you grab two skeins, you can easily get a couple of pairs of mitts out of it – one for you, one for someone on your gift list.

Hero uncropped

From now until August 13th, if you purchase both patterns at the same time (both must be in your Ravelry cart at the same time) you’ll get £1.00 off the pair.

Lambton Panes Kits, And How to Get Them

There’s something new and exciting coming soon! I’ve been working on a collaboration with Lola from Third Vault Yarns to bring you a pattern that’s going to knock your socks off. But first, a bit of backstory.

Lola and I go to the same southwest London knit night, hosted by the lovely Rachel and Allison from Yarn in the City. I’ve been attending this weekly get together as much as possible since moving, as it’s been a great way for me to meet like-minded people in the new city/country/continent. I’ve gotten to know Lola and admire her mad yarn-dyeing skills over this time.

Recently, Lola mentioned that she was going to have a stand at the upcoming Fibre East in Ampthill, Bedfordshire. We started discussing working together to come up with some new patterns and colourways to package into kits to sell at the show. After brainstorming, we came up with the idea of a shawl using two skeins of Third Vault Yarns Companion 4ply, one in a gradient and one in a complimentary neutral shade. I left that knit night with some of that buttery-soft yarn and started swatching, and Lola went to the dye pots and got to dyeing.

What we’ve come up with is the Lambton Panes shawl. It features traveling, slipped stitches over a background of garter stitch stripes, creating a diamond lattice effect.

Hero

The sample is knit with one skein of Blue Steel as the neutral stripes and traveling stitches, and one skein of Cowtown, a custom gradient using my brand colours, for contrast stripes. I’m so excited that Lola created such a cool colourway using the shades of salmon, wheat, and aqua from my brand.

So, where are we going with this? Lola has been dyeing yarns in some gorgeous gradients and semi-solids. She’s made up some of the Cowtown gradient as well as The Poisoned Apple (left) and Hawkeye (right). I’ve seen them in person and I must say, they’re even more gorgeous in real life.

I’ve been working through the editing, testing, and printing process. I’ve already had one tester finish and it’s so pretty!

So here are the important details. The pattern will be released to the general public on Friday, July 29th, for digital download either through Ravelry, LoveKnitting.com, or here on my website. If you’re lucky enough to be attending Fibre East, you can get your hands on a kit (one gradient, one neutral, 8 stitch markers, and a print copy of the pattern) in person on July 30th or 31st, while supplies last. Or, you can visit Third Vault Yarns starting Wednesday, July 13th, and pre-order your kit for delivery after Fibre East.

That’s all the details for now. Stayed tuned here for more news on another collaboration to be unveiled at Fibre East.

Introducing Jodi’s Sweater

Hello! Today I’d like to introduce you to Jodi’s Sweater, a cosy and fun twist on the oversized top.

Possible Hero1 (2)

This piece was inspired by my friend Jodi and this top she had with a twist on the front. As soon as I saw that twist ideas started swirling around in my head about how to make it work as a knitting pattern. The front needed to be reversible, and it had to have some visual interest without being busy. I wanted horizontal stripes, but something that was loose and drapey. I tried lots of different textures and stitch patterns – I mean lots. About a year and a half later it struck me that 2-colour brioche might be just the trick. A few swatches later, lo and behold, that was the one!

Teaser

Once I had the fabric figured out, I needed to tackle construction. There were a few iterations and extensive trial and error, before I came up with the solution. The front is knit first, sideways, starting with a provisional CO. Then the back is worked from the bottom up, and then seamed with the front. Sleeve stitches are picked up around the armholes, and the rest is easy peasy.

Back2 (5)

This sweater is all about the details that make it work. And although there are lots of techniques involved that might be new to you – crochet provisional cast on (to start the front), tubular cast on (to start the back), tubular bind off  (to finish the sleeves), 2-colour brioche, Latvian braid (in a sneaky little place), I-cord bind off (back neckline) – the instructions are clearly written to help you through. The pattern also includes photo tutorials for some of these special techniques.

Front Open (3)

I really hope you like Jodi’s Sweater and find it an enjoyable project. It’s been a long time coming to fruition and I’m really proud of it.

Click here here to go to the Ravelry page, or simply hit this handy    button to go directly to check out.

Tubular Cast On Tutorial (for working flat)

The Tubular Cast On is a magical little CO that is nice and stretchy, and blends oh so beautifully into 1×1 ribbing. It is great for starting top-down socks, bottom-up sleeves, hats, and anywhere you need a stretchy edge for ribbing.

finished look1


My upcoming release, Jodi’s Sweater, calls for the Tubular CO on the bottom of the back panel. I’ve added this photo tutorial to the back of the pattern for those that might need a little visual help, and I thought I’d share it with you too.

It starts off with scrap yarn and a regular CO (I use long tail) that will be pulled out later. This initial CO creates your knit stitches, and then you will increase by creating the purl stitches. A few rows of slipping and working alternate sts will magically lock everything into place and then you’ll be able to remove the scrap yarn without the whole thing unravelling. See, I said it was magic!

What you’ll need: Scrap yarn, needles required from the pattern for ribbing (or a even a size smaller).

You’ll also need to calculate the number of initial CO sts. Take the number of required sts for the pattern (must be an odd number), subtract 1, divide by 2 (this will give you an even number), and add 1 back on (odd number). For example, my sweater calls for casting on 149 sts, so I will initially CO 75 with my scrap yarn (149-1 = 148, 148 / 2 = 74, 74 + 1 = 75). This will be your initial CO number. If your pattern calls for an even number of sts you could initially CO half the required sts plus 1, then decrease that extra st at a later point.

Abbreviations: CO – Cast On;  K – knit;  M1PL – Make a left-leaning purl stitch by picking up the bar between the next stitch and the previous stitch from front to back, and purling it through the back loop;  RS – Right Side;  sl – slip stitch purlwise;  st(s) – stitch(es);  WS – Wrong Side;  wyif – with yarn in front.

Instructions:

With scrap yarn, and using your favourite cast on, CO your initial CO number.

waste yarn CO

Now switch to the pattern yarn.

Purl 1 row.

Purl 1st row

Increase Row (RS): {K1, M1PL} to last stitch, K1. [you will now have the number of sts called for in the pattern]

Increase Row

Row 3 (WS): {sl1 wyif, K1} to last stitch, sl1 wyif.

After 2 rows of slipping

Row 4 (RS): {K1, sl1 wyif} to last st, K1.

Row 5: Repeat Row 3.

And you’re done! Continue on to the pattern as written. The scrap yarn can be removed at any point after this and the stitches will not unravel.

Have fun with your new CO technique, it’s my favourite!